RivetCam is a photographic software for Linux operating system, where you can capture still images with full screen live-view. The software was design to be used to create stop-motion videos.
Key features
- Utilizes the full screen for viewing images,
- All actions are taken with the computer keyboard (thus no mouse is needed to use),
- Works with all v4l (video4linux) cameras (UVC webcams),
- Built with stop-motion in mind:
- Onion skins,
- Motion preview,
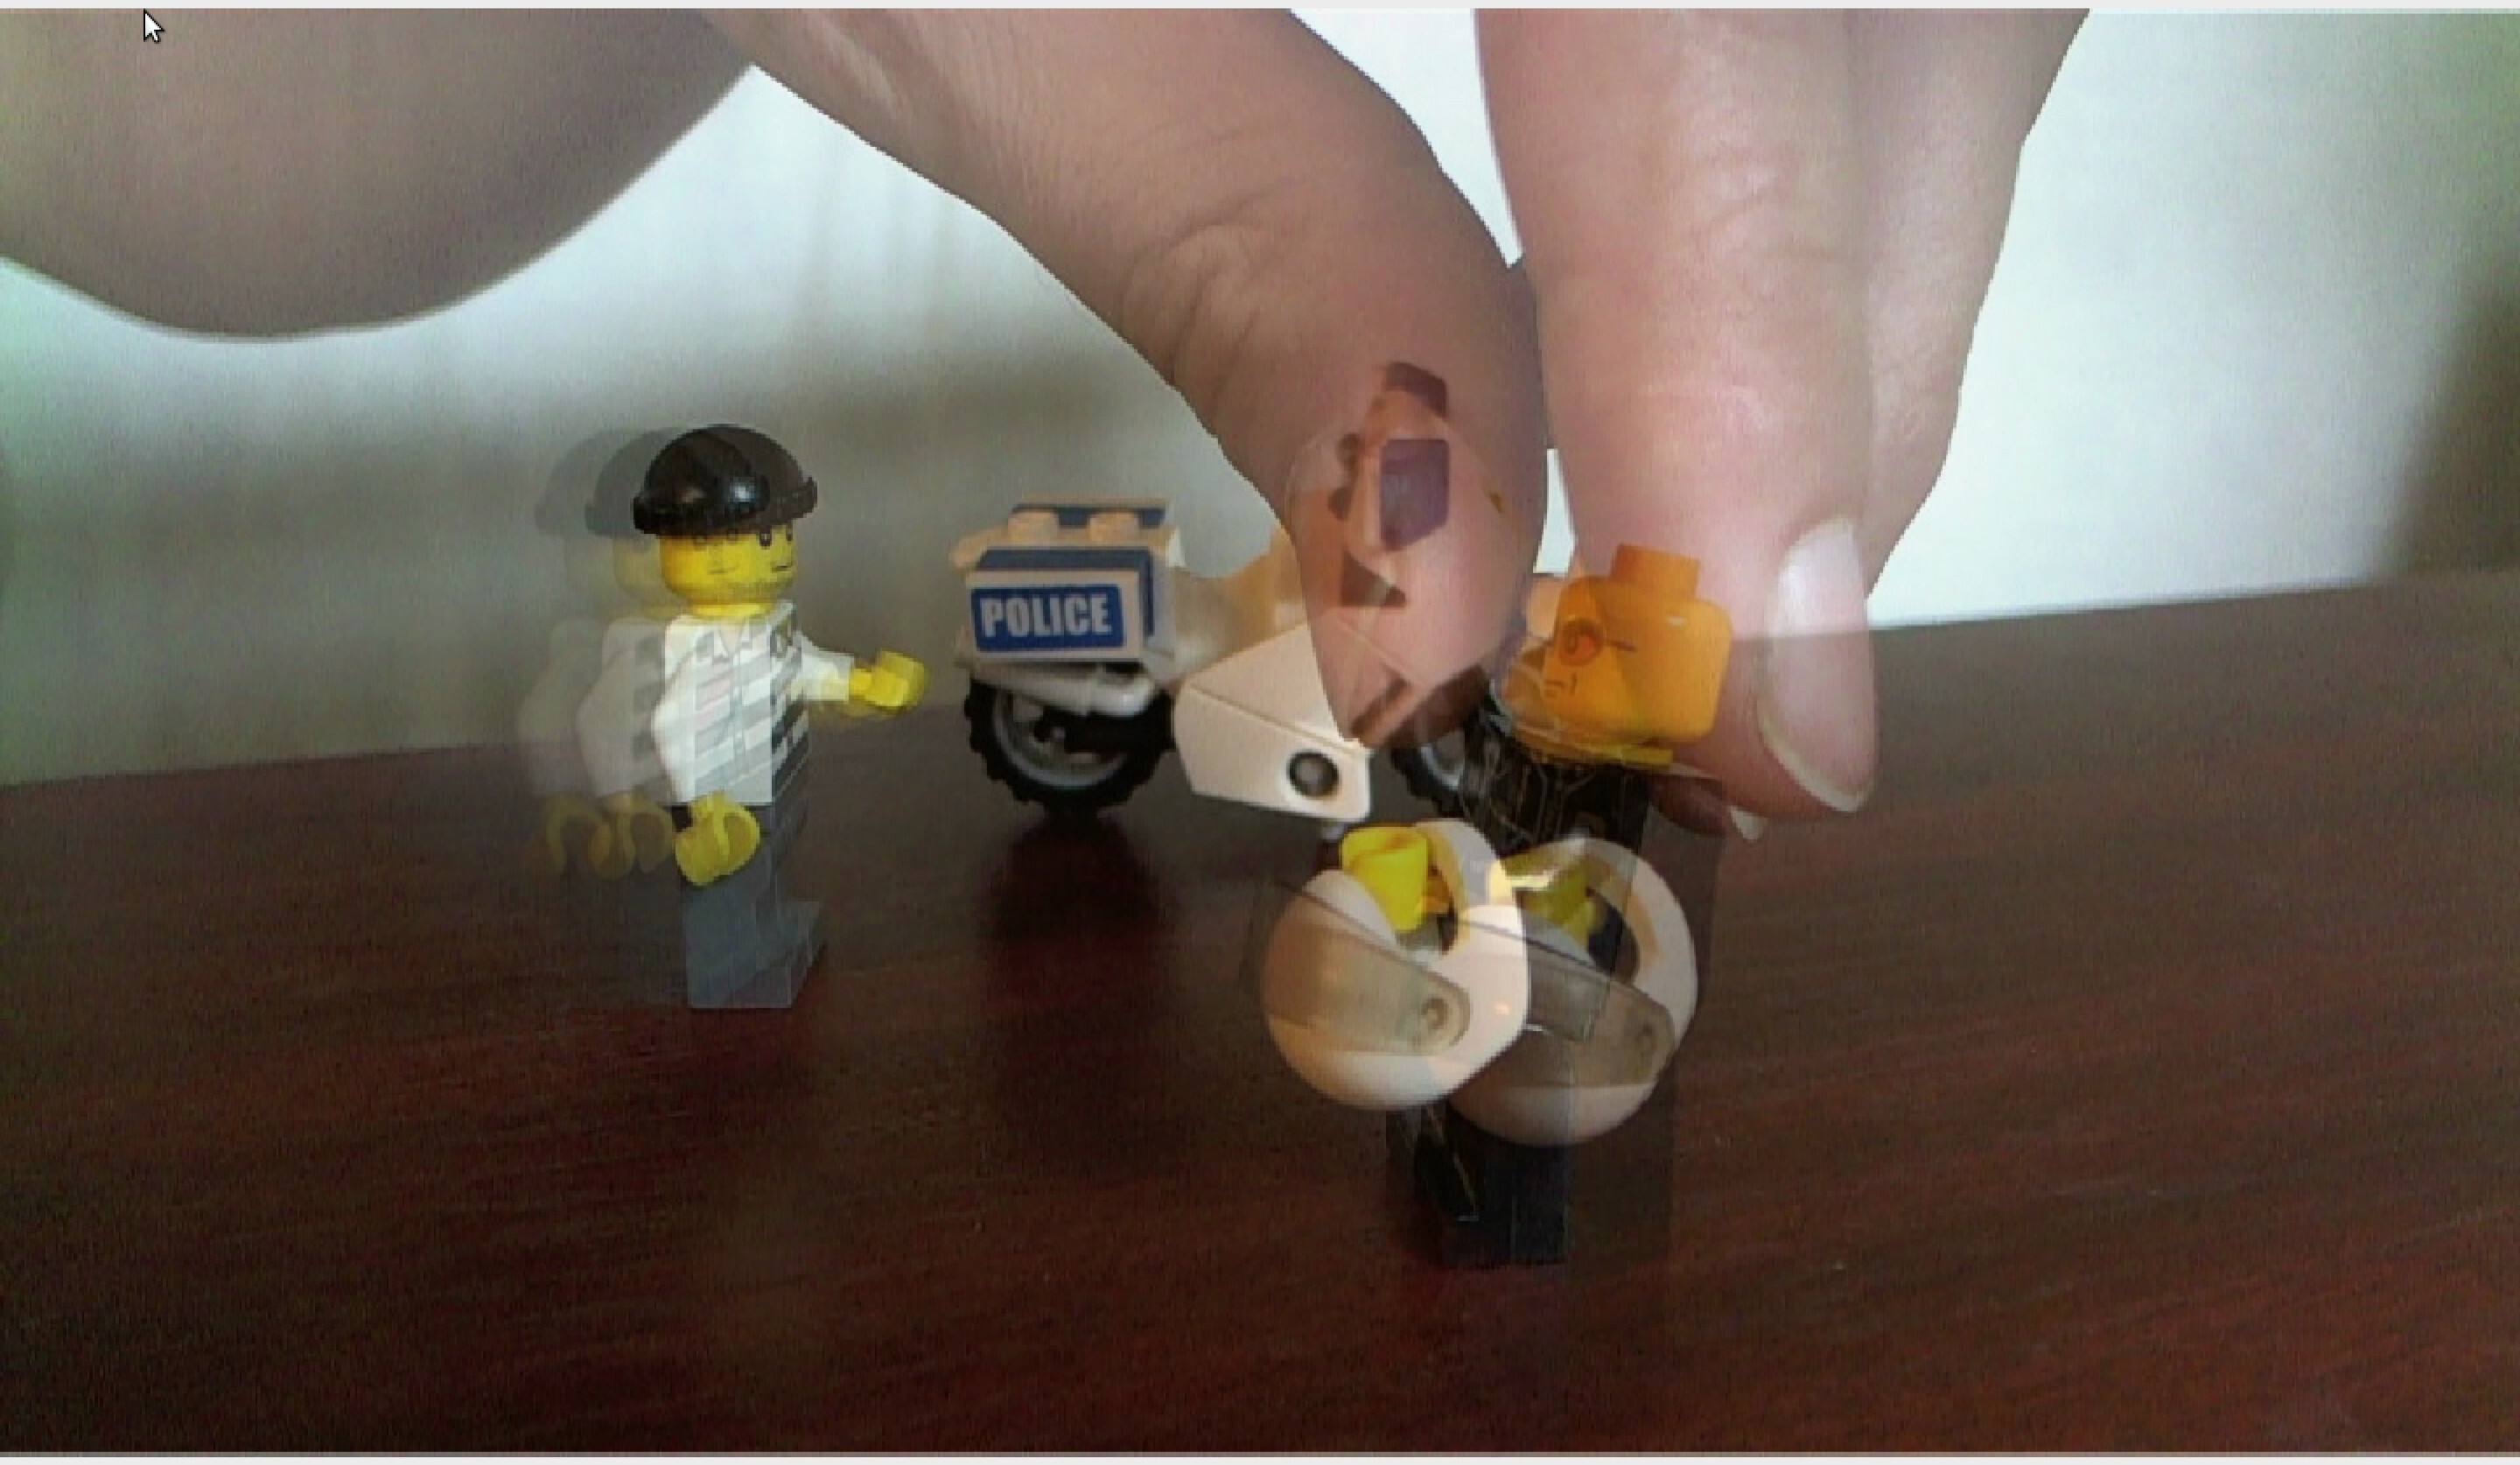
- Manual camera controls, e.g. manual focus.
- Images can be organized to batches.
- Camera specific configurations can be applied by the user,
- Resolution of the live-view can be set to match your screen resolution and have better fps.
- Open source with Java language.
Users guide
Please note, that at this state of the software RivetCam is not recommended for beginners. You will need to run commands in Linux terminal, edit configuration files to access camera specific features, etc.
Install
Requirements
- Linux
- Web camera
This software uses v4l (video4linux), so obviously a Linux PC with a compatible web camera is required for this application to work. Java-Runtime needs to be installed (either Oracle JRE, or OpenJDK RE 1.8 or higher) but that is usually already available on most Linux installations.
Install dependencies (Debian, Ubuntu):
sudo apt-get install openjdk-8-jre libjpeg8
Install dependencies – Raspbian:
sudo apt-get install openjdk-8-jre libjpeg8 wiringpi
Download
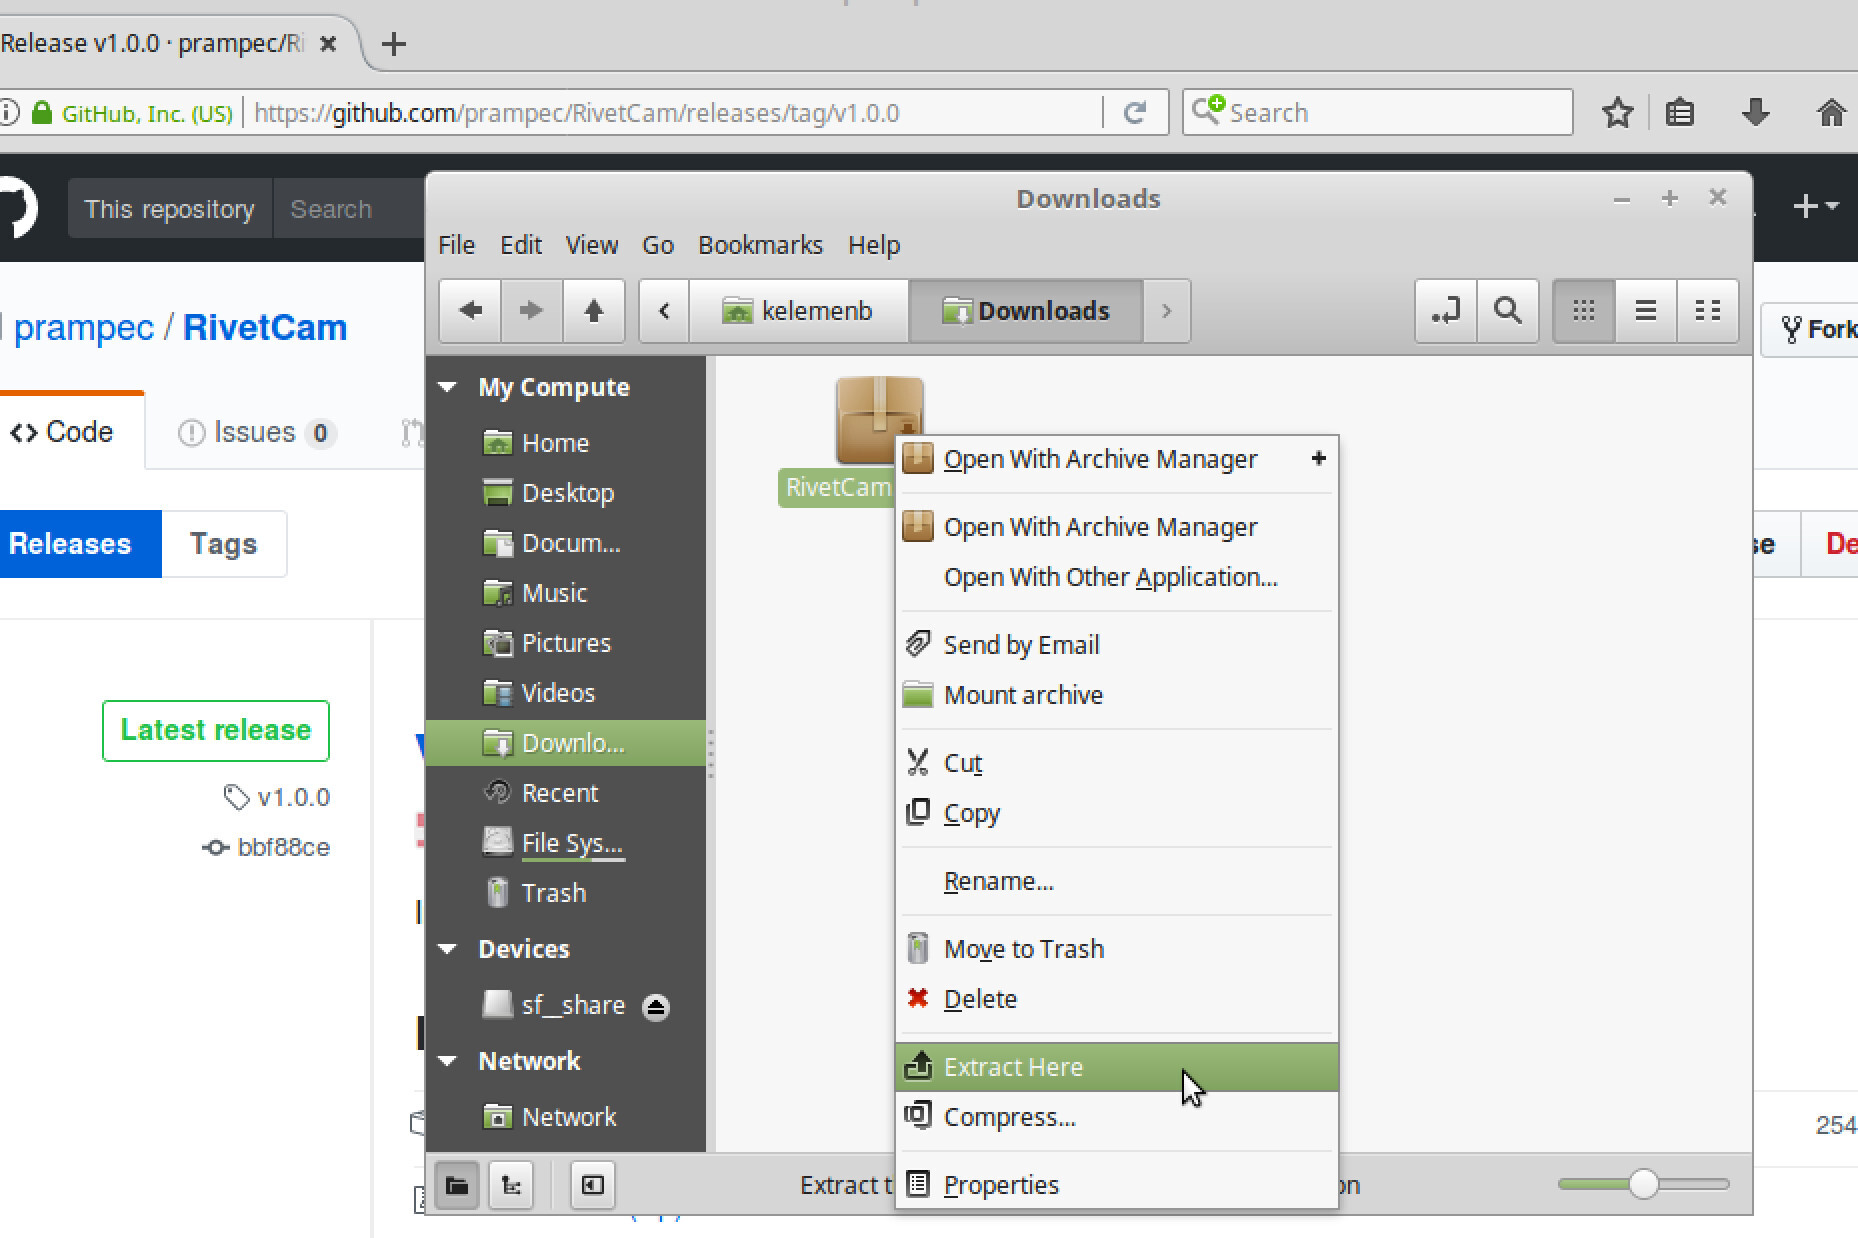
- Download the ZIP release from the project page above, or you can alternatively build your own release from the sources.
- Unzip the RivetCam.zip archive to a desired place. (You want create a subfolder to unzip the content on that folder.)
Some helper scripts are provided for specific platforms. (As the v4l requires some native libraries to work with java).
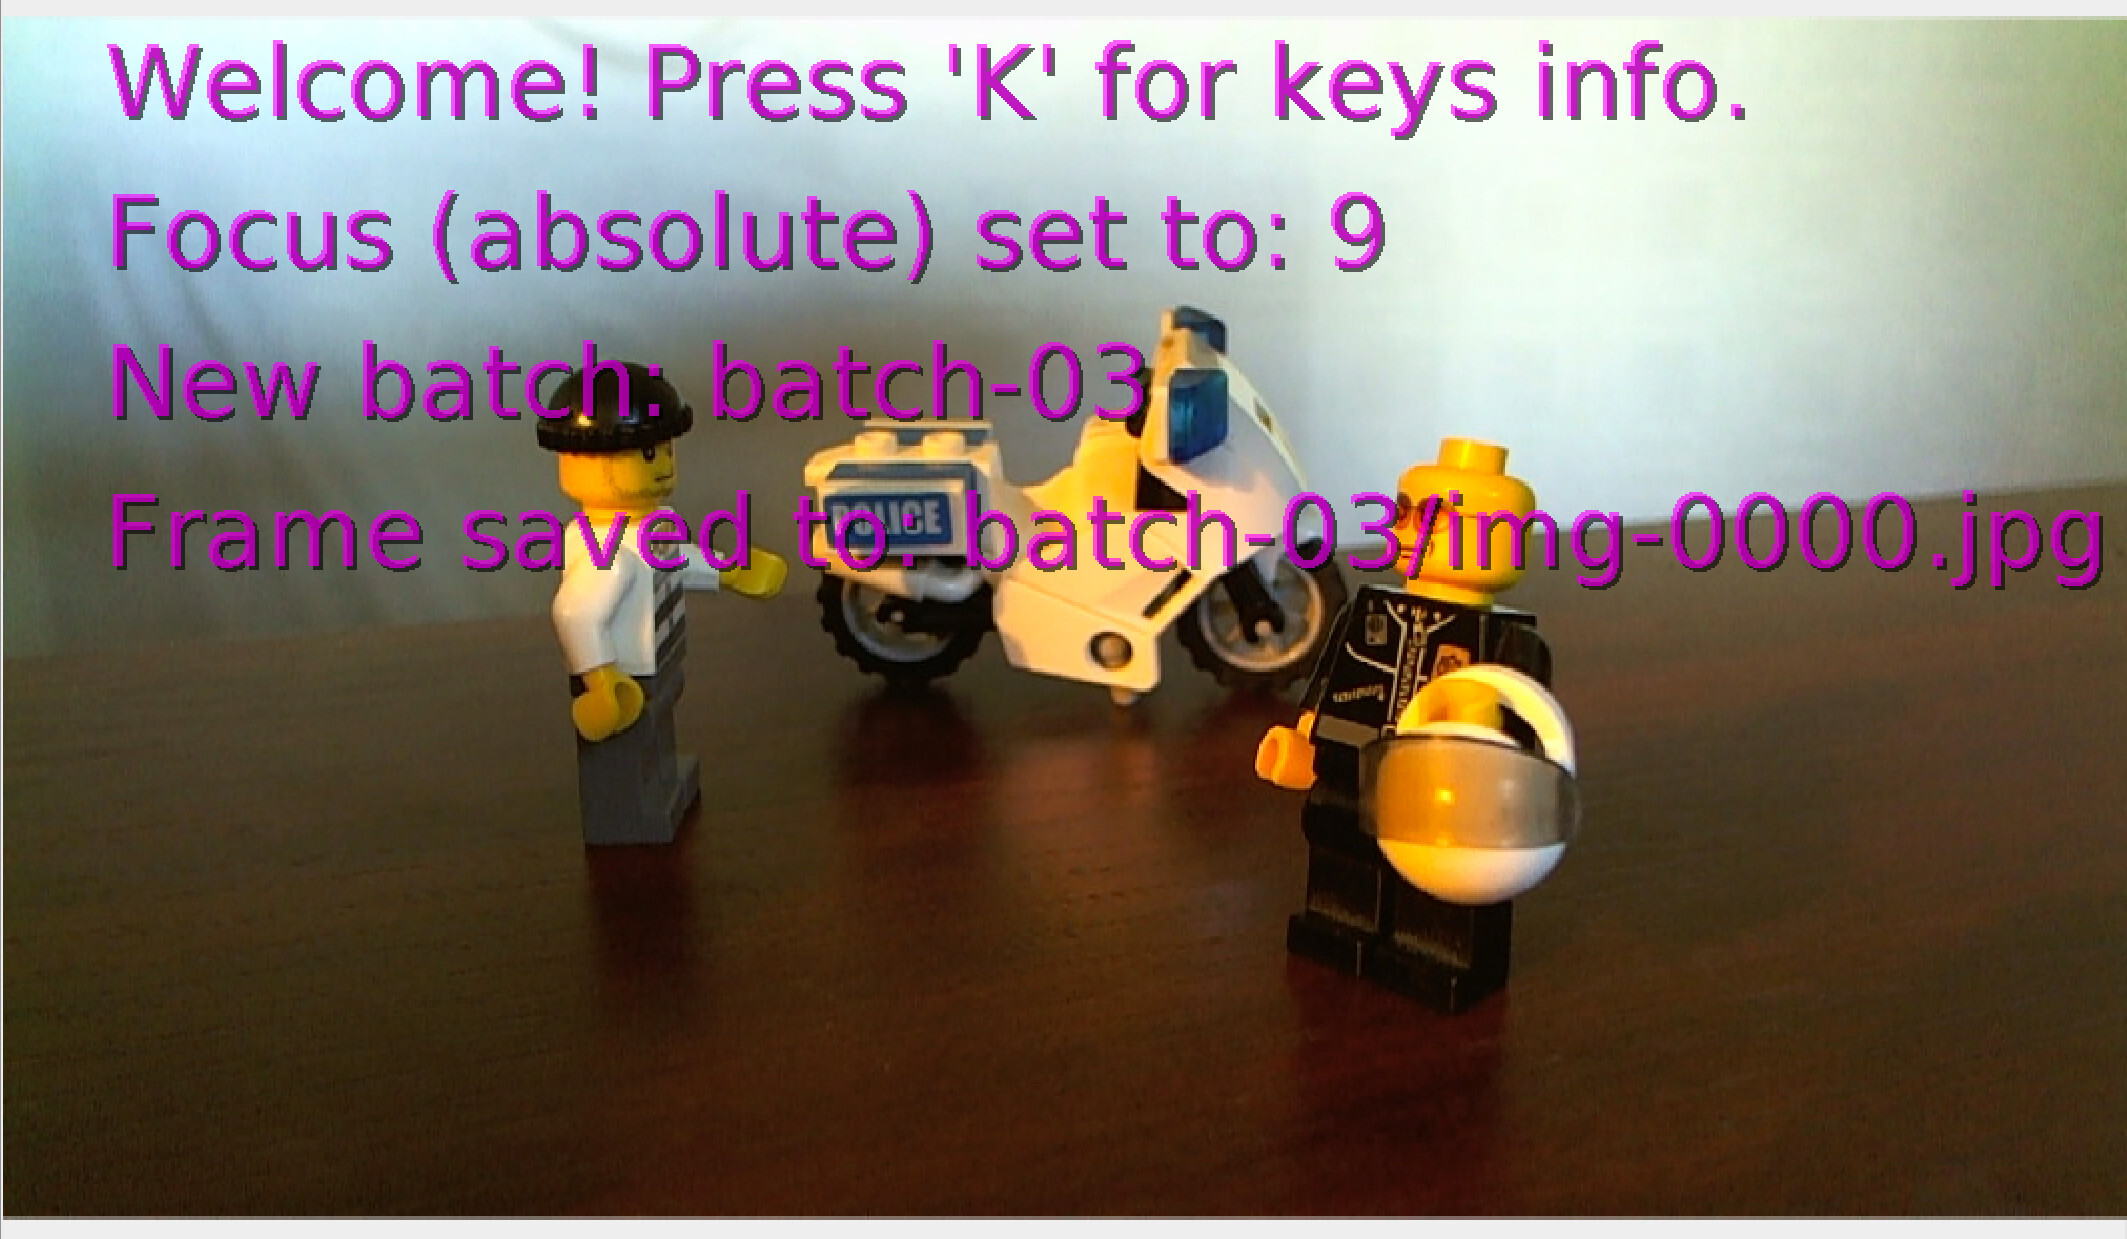
Startup
To run the program you can use the provided helper scripts e.g. use the start-x86-64.sh . After startup you should see the preview of the connected webcam in full screen. Now you can use the keyboard to capture a still image, or modify options. See the “Keys” section for details.
You are very likely to want to specify custom configurations (most likely the capture device and resolutions) in the setup.properties. See “Configuration” for details.
A diagnostic tool is also provided see “Diagnostics” for details.
Keys
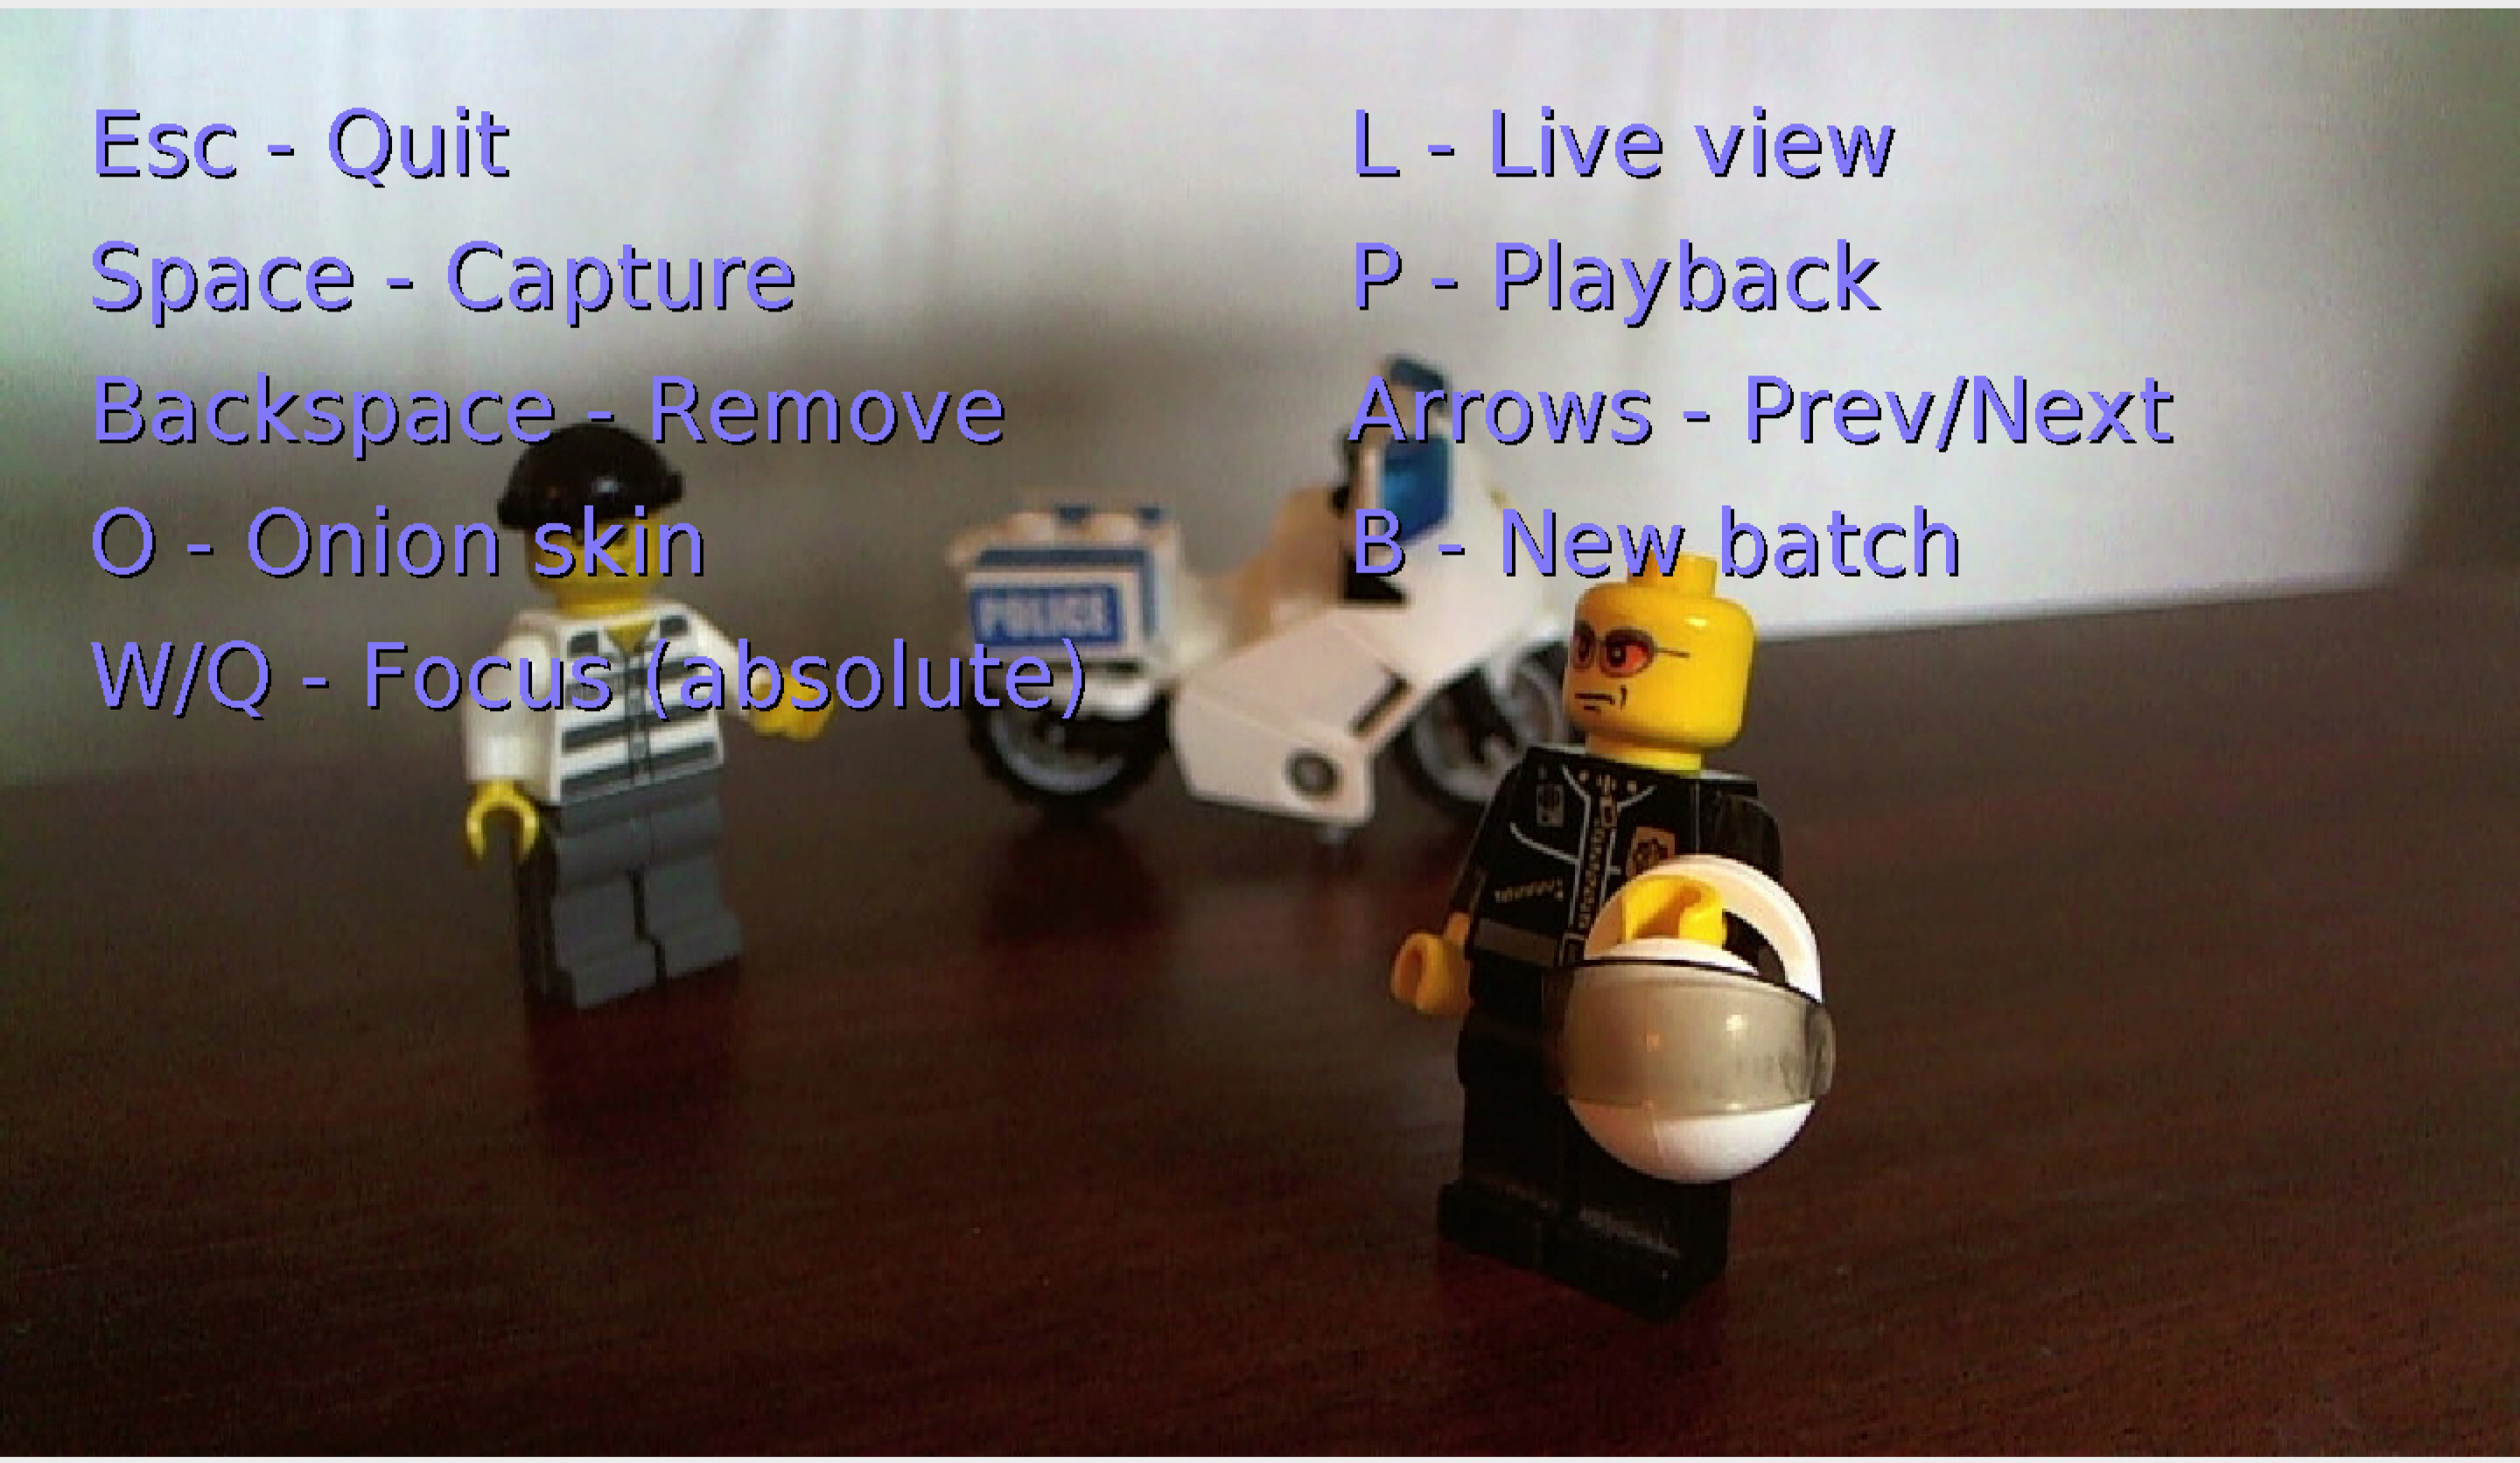
All the user interaction is done by the keyboard. Thus it is essential to know the keyboard shortcuts. Which are:
[table]
Key, Function, Description
Esc, Quit, Exit from the application.
Space, Capture, Captures a still image
L, Live view, Turns between live-view/preview
Left/Right arrow, Navigate in playback, When in playback mode\, with the arrow keys you can step to a previous and a next image.
P, Playback, Turns into Playback mode\, where the last (some) images are played back in a high fps.
O, Onion skin, Toggles onion skins on/off: no onion\, 1 layer\, 2 layers
Backspace, Remove last, Removes the last captured image.
B, New batch, Creates new batch for storing further images.
[custom],Control,You can configure keys to modify camera-specific controls.
[/table]
Other keyboard actions can be associate with camera controls in the configuration. See the “Configuration” for details.
Features in details
When the program starts up, you will see a live view of the webcam image. The live-view is likely to be in a lower resolution and lower image quality than the captured image. In RivetCam you can configure different resolution for live-view and for capture. This way the live view can be smooth with high fps. On the down side of this, webcams likely to loose controls when switching. Meaning: e.g. the focus you have set previously are lost when switching to a higher resolution. This is why manual configuration needs to persisted before switching, and loaded in the new resolution.
In preview mode however you will see the actual captured image. In preview mode you can step back and forward within the previously captured photos. We have a cache here with a default of 20 images to choose from.
Playback mode actually the same as the preview mode, but in this mode the last frames played back automatically in a constant frequency.
Onion skin – With this option, previously captured images are also appears on the live view with a transparency. This is very handy when forming moves in a stop-motion video shoot.
Note, the aspect ratio of the still image (preview and onion skin) and the aspect ratio of the live-view may differs according to your configuration. That might cause onion skin pointless, so please consider setting up the still-image and the live-view with same aspect ratio in the configuration.
When removing the last captured photo, it will delete the image from both the filesystem, and the cache. You can delete more images one after an other.
Batch is a group of images. You can organize your shots in batches to simplify further processing. When the software starts up, it always creates photos in a new batch.
Probably to most powerful feature of the application is the camera-specific setup. You can configure your own keyboard shortcuts, that controls the camera. See “Configuration” for details.
Configuration
Many of the software behavior can be changed by a configuration file. A sample configuration file is provided (setup-sample.properties) where you can find samples of the available configurations.
The configuration file is in java-properties format, and should be saved with name “setup.properties” in the launching folder.
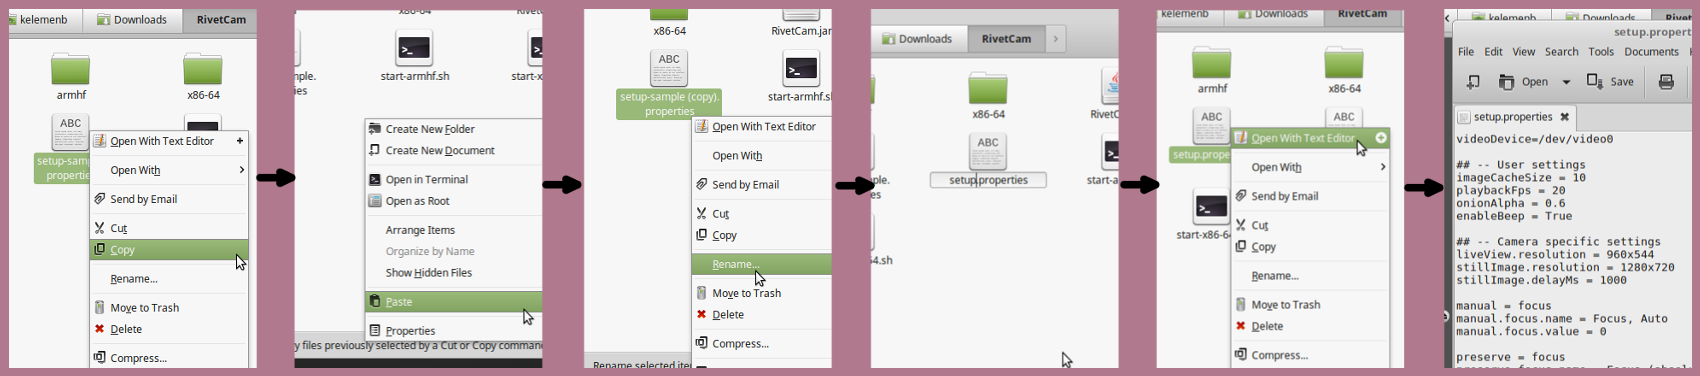
If you want to create your own configuration file, I recommend you to start from the provided file like follows:
- Copy the existing “setup-sample.properties” file.
- Paste it into the same (installation) folder. (Make a duplication.)
- Rename the newly created file to become “setup.properties”.
- Edit the new setup.properties file, to apply your configuration.
Note that all configurable parameters are optional, and has a default value. This way you do not even need to provide any setup.properties file.
[table]
Parameter, Description, Default
videoDevice,Video device file name,/dev/video0 (or videoDeviceName\, if provided)
videoDeviceName,Let RivetCam to look up the video device by a provided name. This time do not provide a videoDevice value.,-
imageCacheSize,Preview/playback images count, 10
playbackFps,Instant playback FPS, 20
onionAlpha, Onion skin transparency (0.1 means not transparent\, 0.9 barely to see),0.6
liveView.resolution,Webcam mode for preview, 960×544
stillImage.resolution,Webcam mode for photo capture, 1280×720
stillImage.delayMs,Wait milliseconds before take a still image. It is a good idea to let the camera initialize itself after mode switching.,1000
baseDirectoryPath,Path for storing batches,.
directoryPrefix,Prefix when creating batch folders,batch-
directoryIndexDigits,Number of digits used for batch numbering,2
filePrefix,Prefix of photo files,img-
filePostfix,Postfix of photo files,.jpg
fileIndexDigits,Number of digits used for file numbering,4
restartFileIndexWithNewDirectory,Define whether numbering should be reset to zero when creating a new batch,False
manual,List of manual control ids,
manual.<id>.name,Name of the control (as seen on “Diagnostics”),
manual.<id>.value,Value of the control to set manual mode.,
preserve,List of ids for persistent controls,
preserve.<id>.name,Name of the control to preseve (as seen on “Diagnostics”),
keys,List of ids for custom controls,
keys.<id>.name,Name of the control to utilize key (as seen on “Diagnostics”),
keys.<id>.inc,Key to increment the control value. Use java.awt.event.KeyEvent constants\, e.g. VK_Q,
keys.<id>.dec,Same as before\, but to decrement the value.,
[/table]
Sample:
videoDevice = /dev/video0
#videoDeviceByName = UVC Camera (046d:0823)

## -- User settings
imageCacheSize = 10
playbackFps = 20
onionAlpha = 0.6

## -- Camera specific settings
liveView.resolution = 960x544
stillImage.resolution = 1280x720
stillImage.delayMs = 1000

manual = focus
manual.focus.name = Focus, Auto
manual.focus.value = 0

preserve = focus
preserve.focus.name = Focus (absolute)

keys = focus
keys.focus.name = Focus (absolute)
keys.focus.inc = VK_Q
keys.focus.dec = VK_W

## -- Files and folders
directoryPrefix = batch-
directoryIndexDigits = 2
filePrefix = img-
filePostfix = .jpg
fileIndexDigits = 4
baseDirectoryPath = .
restartFileIndexWithNewDirectory = False
Diagnostics
List devices
You can list available v4l devices with the command below.
E.g.:
$ ./start-x86-64.sh --devices
[ libvideo.c:68 ] Using libvideo version 0.9-UNKNOWN
Found video devices:
  /dev/video0 - UVC Camera (046d:0823)
Device information
RivetCam provides a diagnostic feature where you can get detailed information of your webcam device.
$ ./start-x86-64.sh --info /dev/video0
[ libvideo.c:68 ] Using libvideo version 0.9-UNKNOWN
Info for device /dev/video0:
  Name: UVC Camera (046d:0823)
  Resolutions:
    MJPEG - 640x480 160x120 176x144 320x176 320x240 432x240 352x288 544x288 640x360 752x416 800x448 864x480 960x544 1024x576 800x600 1184x656 960x720 1280x720 1392x768 1504x832 1600x896 1280x960 1712x960 1792x1008 1920x1080 1600x1200 2048x1536 2592x1944
    YUYV - 640x480 160x120 176x144 320x176 320x240 432x240 352x288 544x288 640x360 752x416 800x448 864x480 960x544 1024x576 800x600 1184x656 960x720 1280x720 1392x768 1504x832 1600x896 1280x960 1712x960 1792x1008 1920x1080 1600x1200 2048x1536 2592x1944

  Attributes:
    "Backlight Compensation" = 0 (0..1/1)
    "Brightness" = 128 (0..255/1)
    "Contrast" = 32 (0..255/1)
    "Exposure (Absolute)" = 664 (3..2047/1)
    "Exposure, Auto" = 3 (1: Manual, 2: Shutter priority, 0: Auto, 3: Aperture priority)
    "Exposure, Auto Priority" = 1 (0..1/1)
    "Focus (absolute)" = 68 (0..255/17)
    "Focus, Auto" = 0 (0..1/1)
    "Gain" = 128 (0..255/1)
    "Pan (Absolute)" = 0 (-36000..36000/3600)
    "Power Line Frequency" = 2 (1: 50 Hz, 0: Disabled, 2: 60 Hz)
    "Saturation" = 32 (0..255/1)
    "Sharpness" = 72 (0..255/1)
    "Tilt (Absolute)" = 0 (-36000..36000/3600)
    "White Balance Temperature" = 4000 (2800..6500/1)
    "White Balance Temperature, Auto" = 1 (0..1/1)
    "Zoom, Absolute" = 1 (1..5/1)
Troubleshooting
Frequently asked questions
- Will it run on Android? – I don’t think so.
- Will it run on RaspberryPi? – Yes.
Known bugs
- Playback FPS is not stable.
Planned improvements
- Do not crash, when facing with wrong configuration.
- Continue file numbering when starting up from previous batch.
- Support more platforms and cameras according to user tests.
- Use RGB or YUV format instead of mpg when creating a snapshot.
- Force to use strict FPS while playback.
- Introduce camera-type based configuration system.
- Introduce modular access to the main system, e.g. attach a GPIO based control module.
- On-screen-display message items to have a validity.
- Multilingual messages
Found a bug or want to Contact me?
Please fill free to contact me with feature requests. If found a problem, please check issues for possible solution at GitHub issues page, where you can also report bugs.
Notes
Run the following command to join the image sequences into an AVI:
ffmpeg -r 10 -start_number 0 -i img-%04d.jpg anim.mp4
Where the “-r 10” means the frame rate (fps), the “-start_number 0” specifies the first file index.